

TechMedX Active Backup
Installation Guide
Step 1: Download and install Active Backup
Step 2: Wait for your Welcome email
Once TechMedX has received a new account request, we will work expeditiously to create the account. This is a manual process, so please allow time for this to occur. If your matter is urgent please contact us at 703-250-0382. As soon as the account is created you will receive an email containing you user name, and connection details.
Step 3: Set a password
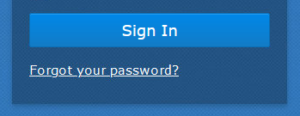
The next step is to reset your autogenerated password. To do so follow the link sent via email or by clicking here. At the login page click “Forgot your password?”
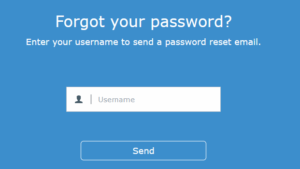
At the next screen enter the account name provided in your Welcome email, and click “Send”
The last step is to create a unique secure password. This will be the password to access all your data, so it should be a good one. Our server requirements are;
Minimum length of 8 characters
Must include Upper and lower case
Must include one Numeric and Special character
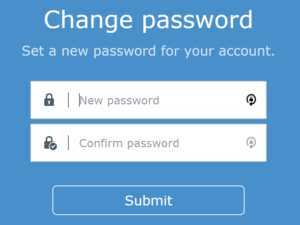
Once completed click “Submit”.
Step 4: Configure the software.
Click on the Synology Active Backup icon to open the configuration window.
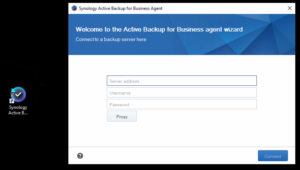
To configure your new backup software you will be asked for three items. These items are listed below.
Server Address – backup.techmedx.com
Your username – recevied in your Welcome email
Your Password – reset in step 3
Once all three fields are completed click Connect. Next the summary screen will apear and click OK will close it and begin your first backup.